Recently, I made a recipe website using Weebly. As time progressed, I learned more and more about SEO and soon realized that rich snippets were crucial. Today, I will show you how to use microformat to markup your recipes, or whatever it is that you would like to display rich snippets in Google search results. I will try to keep this as simple as possible for all types of users to get started marking up there website immediately.
Step 1: Edit Your Header
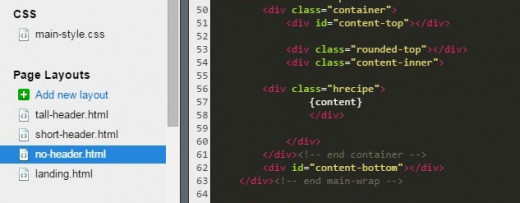
First of all, you want to go to your Weebly website and click 'Edit' on your home screen. Click on the 'Design' Tab and click 'Edit HTML/CSS'. Click on the type of header you used on your recipe pages (Ex: I used noheader.html) Scroll down near the end of the HTML code until you see the </body> tag. You can use websites like schema.org to get the code for your rich snippet. While creating my recipe website, I used this code before the </body> tag.

Editing HTML/CSS Code
Step 2: Defining Your Title
In Weebly, you will have to markup each recipe individually. So you will now save your changes and go to the page you want to create your rich snippet. We will start with the Title of your recipe. It is important to use h1 and h2 tags throughout your website, so you will want to delete your Title box and drag the 'Embed Code' box into its place. The code you will want to place will look something like this:
Step 3: Categorize Each Section
Now we will start with the ingredients. Don't delete that text box yet, you will want to use that to refer to your ingredients listed. Drag the 'Embed Code' box above or below your ingredients list. In that HTML box, you will want to type something like this:
Now you can delete your text box with your ingredients. The directions (or instructions) for your recipe are very similar to the ingredients. Here is the code I used to replace that.
Step 4: Add Additional Features
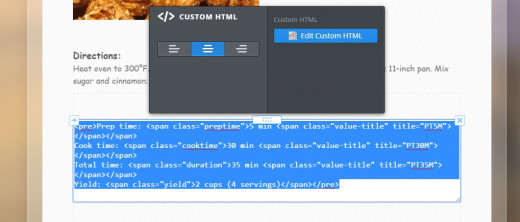
The next few items are all very similar as well. However, a lot of recipe websites want these things in there rich snippet, but not visible on there page. If you hide anything on your page, it will not display in the rich snippet. So make sure nothing is hidden, just add to your page what you want displayed in search results. In order to add how long it takes to make your recipe, you will want to add the prep time, cook time, total time, and duration for your recipe. If your recipe does not need to be 'cooked', you can delete that section. The only part that will display in your rich snippet is the total time, the rest is so Google to categorize your recipe.

Embedding Code to Create Rich Snippets
Step 5: Add an Image
Now, if you have images on your recipe page, you will want to replace that too with HTML instead of the 'Image Box'. This part gets a little complicated and may take awhile at first until you get used to it. You need your image to stay somewhere online so your HTML has somewhere to refer back to. So I made an extra page for all of my images and named it 'Images'. Place your images on this page. You will want to hide this page in navigation, make this page only visible to people with the site password, and hide this page from search engines. Copy and paste the image URL on a notepad so you can refer back to it. It will look like this:
http://www.weebly.com/uploads/3/0/5/9/30599581/1552399_orig.jpg
Now delete http://www.weebly.com so it looks like this:
/uploads/3/0/5/9/30599581/1552399_orig.jpg
Now go back to the recipe page that you were working on. Delete the image from that page. Place the 'Embed Code' box in its place. Images on Weebly have the option to use a 'Lightbox'. A lot of users find this feature to be useful for there website, so I will share with you the code for both. If you want your Weebly website to only display a picture, the code will look something like this:
If you want the 'Lightbox' feature turned on, it will look something like this:
Notice where i replaced the /uploads/3/0/5/9/30599581/1552399_orig.jpg in the HTML. That is where you will place your image URL that you recently copied and pasted onto your notepad. Once everything seems to be in place, you can publish your website.
Step 6: Test Your Rich Snippet
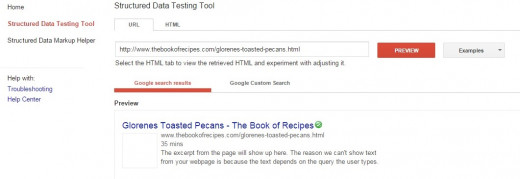
We can now test your rich snippet by going to Google's Markup Tester Tool. Type in the URL for the page you want to check your rich snippet and click 'Preview'. It should look something like this:

Structured Data Testing Tool
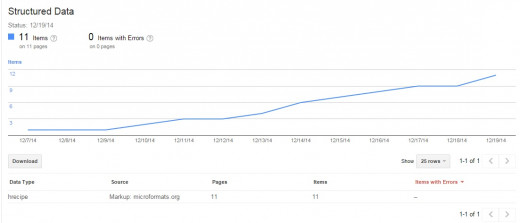
You won't see your image here, but you will see a gray box. If you have reviews and ratings, they will be displayed by your total cook time. If you see the changes you made, then you know it is working properly. It will take about a week before it shows up in your Google Webmaster Tools. It may take 6 weeks or more before displaying in Google's search results. So be patient with these things. It is still good to tell Google how to categorize your recipes to improve your SEO, so i can assure you that it is well worth it.

Structured Data
I know that the process for this can be quiet confusing. I hope that this article can help others to understand how to markup there Weebly website.

EmoticonEmoticon